

Buying a new streaming box is easy. The part that often trips up first-time owners comes right after: identifying the cables, connecting the right HDMI input, choosing between WiFi and Ethernet, pairing the remote, and figuring out what to do once the home screen appears.
The SuperBox S8 Max is designed to make that process relatively straightforward. With Android 12, 4GB DDR memory, 64GB eMMC storage, dual-band WiFi 6, Gigabit Ethernet, and a full-size voice remote, it has the hardware needed for a modern home entertainment setup without requiring a complicated installation.
This guide takes a more practical approach than a standard specifications review. We will start with the physical unboxing, identify what actually matters during installation, connect the SuperBox S8 Max correctly, get it online, prepare the remote and apps, and finish with a short first-run test so you know the box is working properly before you settle in.
What’s In the SuperBox S8 Max Box?
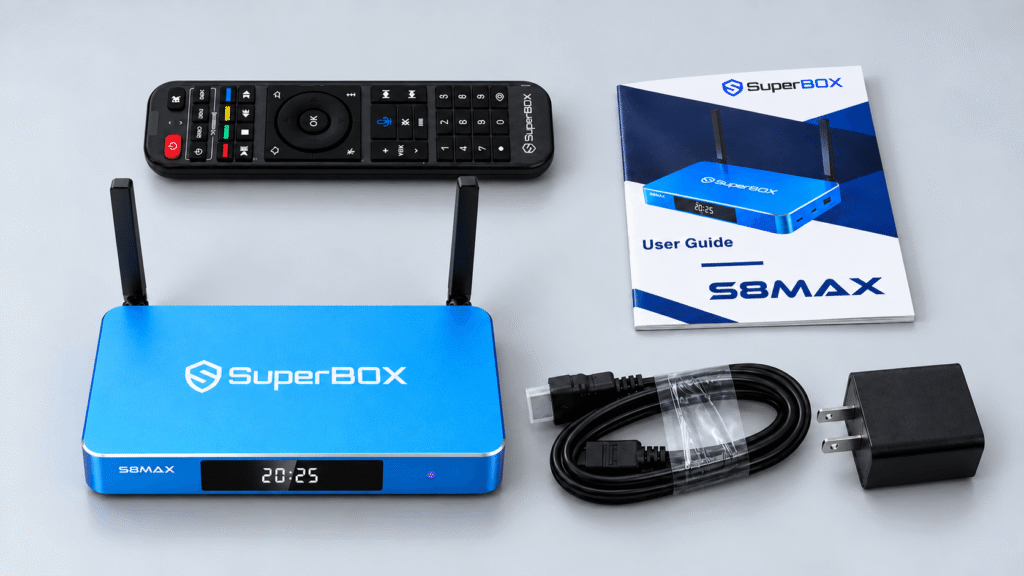
Before connecting anything, place the package contents on a clear table and make sure everything you expect is present.
The SuperBox S8 Max package includes the SuperBox S8 Max, voice remote, user guide, power cable, and HDMI cable. The device uses two external antennas, which should remain unobstructed once the TV box is placed near your television.
- SuperBox S8 Max TV Box
- Voice Remote
- HDMI Cable
- Power Cable
- User Guide
Do not rush to hide the SuperBox S8 Max TV box behind the television immediately. During initial setup, keep the ports visible so you can confirm HDMI, power, and network connections without repeatedly moving the TV cabinet.
A little open space around the device also makes cable management easier and prevents the antennas from being pressed against a wall or other electronics.
Before You Plug Anything In
A few minutes of preparation can save much more time later.
Your television or monitor needs an available HDMI input, and you need a nearby power outlet. If you plan to use WiFi, have your network name and password ready. If you prefer a wired connection, prepare an Ethernet cable long enough to reach from the router or network switch to the SuperBox S8 Max.
The SuperBox S8 Max supports USB, Ethernet, HDMI, and other connection options. Because port arrangements can vary between products and production revisions, it is good practice to read the physical labels on your own unit instead of connecting accessories by position alone.
Setup Tip: For the first startup, keep things simple. Connect only HDMI, power, and one internet connection. External storage and other accessories can be added after the basic setup is working correctly.
Step 1: Connect the SuperBox S8 Max to Your TV
Start with HDMI.
Connect one end of the supplied HDMI cable to the SuperBox S8 Max and the other end to an available HDMI input on your television. If the TV has several HDMI ports, remember which number you used—for example, HDMI 1 or HDMI 2.
Next, connect the supplied power cable to the SuperBox S8 Max and plug it into a suitable power outlet.
Turn on the television and select the same HDMI input you used for the TV box. After startup, the SuperBox interface or setup screen should appear.
If the television still shows No Signal, do not immediately assume the SuperBox S8 Max is faulty. First confirm that:
- The TV is displaying the correct HDMI input.
- The SuperBox S8 Max is receiving power.
- Both ends of the HDMI cable are firmly connected.
- The HDMI cable is connected to the correct TV port.
If necessary, reconnect the HDMI cable or try another available HDMI input on the television.

Step 2: Complete the First-Start Screen
Once you see the initial setup interface, follow the prompts shown on your own device.
Depending on the current software version, you may be asked to confirm basic settings, connect to a network, adjust the display area, or complete other first-start options.
Menu wording may change after software updates, so use the labels displayed on your own SuperBox S8 Max rather than expecting every screen to look exactly like an older tutorial.
If parts of the interface are cut off near the edge of the television, look for display or screen-position settings and adjust the visible area until the full interface fits correctly.
For video resolution, automatic or recommended settings are usually the easiest place to start. The SuperBox S8 Max supports high-resolution decoding, but actual output depends on the TV, HDMI connection, source material, and software being used.
Step 3: Choose WiFi or Ethernet
The SuperBox S8 Max supports both dual-band WiFi 6 and 1000Mbps Gigabit Ethernet.
Neither option is automatically better for every home.
When WiFi Makes Sense
WiFi is convenient when the router is located elsewhere in the room or house, and you do not want to run another cable.
During setup, select your wireless network, enter the password carefully, and wait for the interface to confirm that the SuperBox S8 Max is connected.
When Ethernet Makes Sense
Ethernet is worth considering when your router is close to the television. A wired connection removes wireless distance and interference from the connection between the router and your SuperBox.
If you regularly watch live sports, high-resolution video, or use several connected devices in the same home, Ethernet can provide a particularly stable option.
Important: WiFi 6 support does not guarantee a specific internet speed. Your broadband plan, router capability, router placement, local interference, and other connected devices can all affect real-world performance.

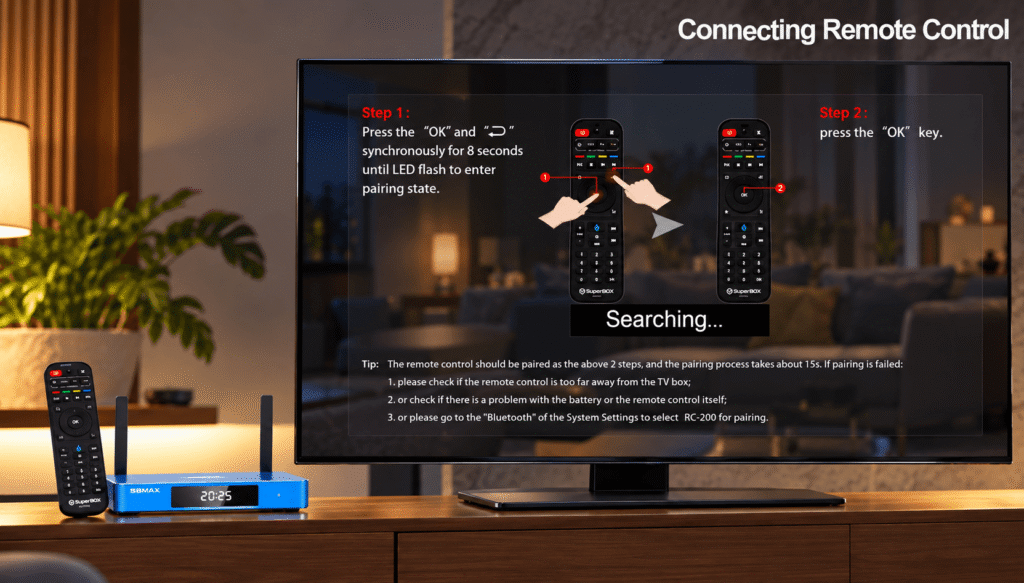
Step 4: Pair and Test the Voice Remote
The SuperBox S8 Max includes a full-size voice remote designed for navigation, searching, and everyday control.
Basic navigation may work before full Bluetooth pairing, but pairing can enable a more flexible connection and supported voice features.
During the first-start process, follow the remote-pairing instructions displayed on the television. Keep the remote reasonably close to the SuperBox S8 Max while pairing and wait for the interface to confirm that the process has completed.
After pairing, perform a quick test:
- Use the directional buttons to move through the interface.
- Press OK to open an item.
- Use the Back or Return button.
- Adjust the volume if supported by your current setup.
- Test voice search in a supported field.
If basic navigation works but voice control does not, finish the rest of the setup before repeatedly pairing the remote. The issue may be limited to Bluetooth or a particular voice-enabled screen rather than the remote itself.
Step 5: Learn the S8 Home Screen Before Installing Everything
This is one area where many new owners move too quickly.
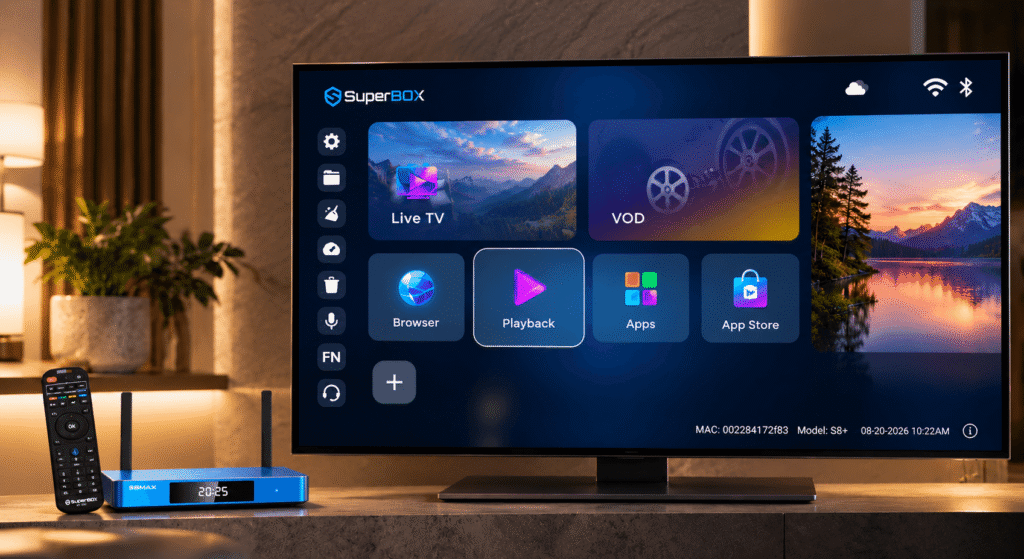
Instead of immediately installing every available application, spend a few minutes learning the SuperBox S8 Max interface first.
Locate the main areas you are likely to use:
- Settings
- Network settings
- App Store or app-management area
- Main entertainment applications
- Storage information
- Display and audio settings
Learning where these sections are located makes troubleshooting much easier later. If something stops working, you will be better able to tell whether the problem comes from the box, the network, or one particular app.
Step 6: Install the Apps You Actually Plan to Use
The SuperBox S8 Max includes access to its application environment, allowing users to add compatible apps and entertainment tools.
During the first setup, install apps one at a time rather than downloading everything at once.
This approach gives you two advantages:
- You can confirm that each installation finishes successfully.
- If one app causes a problem, you immediately know which app needs attention.
The SuperBox S8 Max includes 64GB of eMMC storage, but the operating system, installed apps, recordings, and local data all use part of that capacity.
It is therefore better to install applications because you actually intend to use them, rather than simply because they appear in the app list.
If a download appears stuck, confirm that the SuperBox S8 Max still has internet access before repeatedly restarting the installation.

Step 7: Test the SuperBox S8 Max Before Calling Setup Complete
Don’t consider setup finished simply because the home screen appears.
Spend another five minutes doing a controlled first-run test.
- Open one installed app and confirm that it loads.
- Check that picture and sound are both working.
- Test remote navigation again.
- Confirm the WiFi or Ethernet connection remains active.
- Try returning to the home screen.
- Restart the SuperBox S8 Max once and confirm that it reconnects correctly.
This quick test creates a useful baseline. If a problem appears later, you already know that HDMI, sound, network access, and the remote were working correctly at the end of the original installation.
A Better Way to Organize Your First Day With the SuperBox S8 Max
Your first day with a new streaming device should focus on creating a stable setup, not changing every possible setting.
A practical process is:
- Finish the basic hardware installation.
- Confirm picture and sound.
- Connect to WiFi or Ethernet.
- Pair and test the remote.
- Install a few core applications.
- Restart the box once.
- Explore advanced features after the base system is stable.
The SuperBox S8 Max also includes features such as Multi-View, Picture-in-Picture, built-in recording, 7-Day Time Shift, voice control, parental controls, and 4K playback.
You do not need to configure every feature within the first ten minutes. Explore them one at a time after the basic system is working properly.
Common SuperBox S8 Max Setup Problems
| Problem | What to Check First |
|---|---|
| TV shows No Signal | Check the TV input, HDMI cable, and SuperBox S8 Max power connection. |
| WiFi will not connect | Re-select the network and carefully enter the WiFi password again. |
| Ethernet is not detected | Confirm the cable is connected securely to both the SuperBox S8 Max LAN port and router. |
| Remote will not pair | Check the batteries, stay close to the box, and repeat the on-screen pairing process. |
| Picture is cropped | Adjust the SuperBox S8 Max display area and check the TV’s picture size or zoom setting. |
| No sound | Check TV volume, SuperBox S8 Max volume, HDMI connection, and audio-output settings. |
| App will not download | Confirm internet access and retry the installation. |
| One app will not open | Test another app to determine whether the issue is specific to one application. |
What Makes the SuperBox S8 Max Setup Different From Other SuperBox S8 Models?
The overall software workflow is similar across the SuperBox S8 family, but the hardware configurations are not identical.
The SuperBox S8 Max uses 4GB DDR memory and 64GB eMMC storage and is positioned as the Best Value model in the SuperBox S8 lineup.
Other models offer different storage levels and feature configurations, which means you should not blindly copy every physical connection shown in a tutorial for another SuperBox S8 model.
Always check the labels and ports on the device in front of you before connecting accessories.
Compare SuperBox S8 Max vs other SuperBox S8 series; read our SuperBox S8 Review.

Should You Update the SuperBox S8 Max During the First Setup?
If the SuperBox S8 Max displays an official system-update notification during setup, read the on-screen information carefully before continuing.
It is generally best to make sure the device has a stable internet connection and reliable power before starting any system update.
Do not unplug the device while an official update is actively installing.
After the update is complete, allow the SuperBox S8 Max to restart normally before opening apps or changing additional settings.
Where Should You Place the SuperBox S8 Max?
Placement can affect convenience and wireless performance.
Try to position the box:
- On an open TV cabinet or shelf.
- With both antennas unobstructed.
- Near enough to the TV for comfortable HDMI cable routing.
- Close enough to Ethernet if you plan to use a wired network.
- Away from excessive heat or tightly enclosed spaces.
Avoid burying the SuperBox S8 Max behind other electronics if doing so blocks the antennas or makes the ports difficult to reach.
Final SuperBox S8 Max Setup Checklist
Before you start using the SuperBox S8 Max as your everyday entertainment device, confirm that:
- The HDMI picture is displaying correctly.
- Sound is working.
- WiFi or Ethernet is connected.
- The voice remote is responding correctly.
- The display fits your TV screen.
- At least one app opens normally.
- The device restarts and reconnects without problems.
Keep the original packaging, user guide, and supplied power equipment somewhere accessible. They can be useful if you later move the SuperBox S8 Max to another television or need product information for support.
Final Thoughts
Setting up the SuperBox S8 Max does not need to be complicated. The easiest approach is to work in a clear order: connect the hardware, get the device online, pair the remote, learn the interface, install only the apps you need, and then test everything before exploring the more advanced S8 features.
Once the basic setup is stable, you can start exploring Multi-View, Picture-in-Picture, recording, Time Shift, parental controls, voice features, and the rest of the SuperBox S8 Max entertainment experience.
If you are still deciding whether the SuperBox S8 Max is the right model for you, visit our SuperBox official store or view the latest specifications and availability on the SuperBox S8 Max product page, or read our SuperBox S8 Max Review.
Frequently Asked Questions
What comes with the SuperBox S8 Max?
The current package includes the SuperBox S8 Max, voice remote, HDMI cable, power cable, and user guide.
Can I connect the SuperBox S8 Max with Ethernet?
Yes. The SuperBox S8 Max supports Gigabit Ethernet as well as dual-band WiFi 6.
How much storage does the SuperBox S8 Max have?
The SuperBox S8 Max includes 4GB DDR memory and 64GB eMMC internal storage.
Does the SuperBox S8 Max include a voice remote?
Yes. A full-size voice remote is included with the SuperBox S8 Max.
Should I use WiFi or Ethernet with the S8 Max?
Both options are supported. WiFi is more convenient when your router is farther from the TV, while Ethernet can provide a stable wired connection when the router is nearby.
What should I do if my TV says No Signal?
First, confirm that the television is set to the correct HDMI input, the SuperBox S8 Max is powered on, and both ends of the HDMI cable are firmly connected.
Related guide: Choose Wi-Fi or Ethernet for setup